Saturday, September 26, 2009

Old cabinet


Here is the small medicine cabinet that I had hanging above my stove. Cute, but too small to hold all my spices. Today, at a rummage sale, I found this cabinet for $32.

It is oak, I think, and begs to be stripped of the ugly paint but there are about 502 other projects ahead of it. I have another cabinet in the basement that I plan to put up here but there is much work to do on it before it is ready to hang.

I put a quick coat of paint on the inside to clean it up a bit. I used four 1/4 bolts to screw it into the studs but I worry about it falling. The chair rail on the wall holds much of the weight but I added some additional screws to secure the back to the frame.

Top shelf holds my collection of Kokeshi dolls. I have not had a place to display them for a while. So, it is ok, another quick fix for a room that needs a major overhaul/restoration.

Sunday, August 16, 2009

Tomato Cages and a Rain Barrel


Here is the rain barrel I put together last summer. I bought the barrel for $5 at our local Coca cola bottling plant so I know there was nothing more toxic in it than high fructose corn syrup (toxic enough!) I drilled a couple holes, screwed in a brass faucet and an overflow spout and she is done. Some might say this is terrible waste of treadle sewing machine stand, but it is so cute. I topped the stand with a metal grate I found while walking the dog one day, hooked the barrel to the downspout and there it is.


This year's garden project was making tomato cages. I have been frustrated by wimpy cages and spent time making wooden cages that rotted and broke into pieces. Then one day, on another dog walk, I spotted a tomato cage that would work and be long lasting.

It began with a 16 x 4 foot cattle panel at the local fleet and farm place. Before hauling it out of the lumber yard I had them cut it half with their bolt cutters so I could get it on top of the car. At home I cut it apart into 1 foot wide sections. I first tried using my Sawzall with a metal cutting blade but that took forever so I went and bought a metal cutting blade for my (borrowed from neighbor) circular saw. That cut through the heavy fencing like butta'. I use the grinder to smooth the cut edges. I cut off the bottom so that I could set the cages into the ground.
Add Image
I considered making them square but found that they were large enough in a triangular shape. I fastened the sides together with plastic zip ties. This way the ties can be cut and the cages can be stored flat inside during the winter.

Each cattle panel cost about $25 and yielded 8 sections. Three (or 4) sections make a cage so they cost about $9 each to make. They are sturdy and will last for years, I believe. Here they are in the garden. The tomato plants have since grown up and over the top but are well supported.

Happy tomatoes, happy me!

How I Insulated the Attic

So, this is the rock wool insulation that was in my attic when I bought the house. Every so often a hunk of it would fall off into the attic space below. I used duct tape to hold it up but finally it was time to remove it all and reinsulate.


This space is tall enough to walk in and I wanted to keep it a warm space for storage so I chose to insulate under the roof as opposed to insulating the floor and knee walls. I explained how I came to that decision in an earlier post.
I started off with 4x8 sheets of foiled backed polyisocyanurate- or Thermax or Tuff-R.
I hauled them home on the roof of the Passat.

I pulled them upstairs and got to work.

As I explained in an earlier post, I wanted a 1 inch air space between the roof and the insulation. There has been some debate as to whether or not that is needed but I decided to go with it. To create the airspace, I first used some 1/2 inch x 1 inch long boards nailed the full length of the rafters but that involved using a lot of wood and was going to add a lot to the cost. I decided I could use pieces of the insulation. So I cut that into lengths about an inch wide and used them to provide the spacing for the air gap.

I used adhesive to secure it to the rafters. This would prevent the insulation panels from making contact with the roof boards.
In retrospect, I should have applied the pieces to the whole length of the rafter. This would have sealed the area better. I had plenty of scraps of this stuff so there was no need to break it apart and space it like I did. My goal was to have no air infiltration from the ridge and soffit vents in to the attic space and using one long strip would have helped.
I measured between the rafters and cut each piece of polyisocyanate to fit. The rafters are approximately 3 1/2" wide. So there was one inch of air space and 2 pieces of polyisocyanate between the rafters.

It was very easy to cut and work with, lightweight but it was time consuming measuring and cutting each individual piece. I put the shiny aluminum side facing the roof rafters on the first layer but I was unsure about the second layer.

I decided to face the second layer out. I fitted each layer between the rafters. I filled any gaps with expanding foam insulation and then taped all the seams with foil tape.

It certainly made the space much brighter. I then used full sheets to add another layer of insulation on top of the rafters. I used screws and 1.5" plastic washers to hold the third layer up on to the slanted surface.

East side of the attic:
West side of the attic:
All the furniture and stuff from the sewing studio is packed in here as I work on painting and replacing the carpeting.

Lots of cutting and fitting was needed to work around the studs in the knee wall. Well, it is a lot taller than a knee wall.
And that is how I insulated my attic!

Monday, May 4, 2009

Unconventional hair care products

The attic insulating continues. "Great Stuff" sprayed above the attic doorway closes gaps but unfortunately drips before it cures.

Nothing would get that crap out of my hair but this... I was almost ready for the scissors.

I spent all day Saturday at an auction and picked up these vintage beauties among other things.

The fan is GE, I love the color. The quilt is hand pieced and hand quilted, full size "Grandmother's Flower Garden." I am currently piecing one of my own using vintage and retro fabrics but I just lost all motivation to continue working on it...

Sunday, April 19, 2009

Spring time

Another warm day, perhaps spring is here. It's a mixed bag, I can open the windows and do all those dust and vapor producing house renovation tasks but then there are all those outside projects to do. Ahh springtime...
Saturday, my Passat wagon once again became a pick up truck.

I am always amazed how much yard waste this small lot (small half-of-a-lot) can generate. I have a compost bin but each spring or fall I load 2-3 car loads of leaves and garden waste and haul it out of here. My town has a compost site where grass, brush, and leaves can be taken. There is no curbside pickup.

My little flower garden, below. The tulips, crocuses, and daffodils are making their way up. The rain barrel is hooked up but the second one still needs to be connected. I need to install a length of gutter as well.


I was told that the landscape fabric I put down to clear this section of weedy lawn would not do the job so I added a layer of black plastic. This morning it was raining and I saw little ponds forming on top of the plastic. Ideal mosquito spawning pools so I went out with a pitch fork and poked holes to let the water drain through in the low spots.

Sunday, April 12, 2009

Windows

I worked on this set of windows this weekend. This is the south end of the sewing studio. Before: They don't look bad but most of the glazing has deteriorated on the outside.

I used a utility knife to score the paint between the stop and the side trim. My windows have interlocking weather stripping all around but that was easy to pull off as it was attached with only a small nail at the top and bottom. Once that was removed I could slide one side of the lower sash out and remove it after I pulled off the sash rope. I pulled out the parting bead (it came out in one piece!), and then I was able to remove the upper sash easily as well.

In the picture above you can see the little hole on the right that give me access to the sash weights for that side of the window. I also took out the center trim piece in order to access the cavity shared by both windows. I took this opportunity to put a piece of foam insulation in this space. There is enough room in there that this will not interfere with the movement of the weights. Here is a view at the top of the cavity.

I stripped the paint on the sides and bottom. The storm windows will keep out unwanted guests until the sashes are put back in place.

I then spent hours scraping out the old glazing compound. Fourteen pieces of glass remove without one breaking. I marked their specific locations on a piece of painters tape indicating the space it came from. Each piece was cut to fit its individual spot. R is for right window and an arrow for up.

I made this little thing to protect the glass when using heat to soften the old glazing for easier removal. It is a piece of sheet metal and thick cardboard sandwiched together and held together with foil tape. The metal reflects the heat and the cardboard insulates the glass. I made it the same size as the smaller panes of glass. It worked great, no cracked glass!!


Here is an upper sash, all the glass removed. This is the interior side.

Here is the exterior side with the white paint taken off. Here is the original color of these windows. I stripped all the paint, the green has stained the wood, or maybe it was a stain.

Now here is the problem. Below is a picture of a lower sash. I stripped the paint off of this because it had been overpainted and because it was easy. What I have is a perfectly nice wood window.

The problem? This whole room has painted white trim and I do not want to strip the paint in this room, at least not in the next couple of years. I just want to get these windows reglazed and protect the exterior wood and them get them installed again. I have a whole house full of painted wood on the lower level that I am working on.

My options-
1. Don't strip the old paint on the interior, just sand it lightly and repaint.
2. Do a full restoration, strip the old paint, restain and or shellac to bring the windows back to their original condition. Leave the surrounding trim white until I can refinish it at a later date. After all, with windows are out and accessible, might as well go all the way.
3. Strip the old paint and prime and repaint it white to match the rest of the room. I am not happy with this option because I HATE when people paint over the original finish of wood.

I think I am going to go with number 1. By not stripping the wood now, it will be easier to strip it later as there is that easy melt layer of shellac still there. By repainting now, I may not get the crisp detail I want, but it will be ok. Any thoughts?

Sunday, March 29, 2009

Small things

The grossness of the attic insulating needs to be balanced with some smaller, simpler tasks that move me closer to my goal of getting this space done this spring.
Here are the doorknobs that have been spray painted (I think) a weird silver finish.

And I will be tackling these windows. They need to be reglazed. The glazing is in very rough shape.

The window latches were painted some weird glitter/gold color. Spraypaint, again I think. See the chunks of glazing ready to fall off?

The sash lifts (is that what they are called?) only have a bit of paint around the edges. They have a nice patina. Are they bronze? brass?

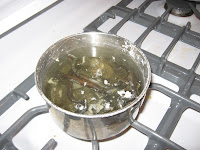
Into the cooking pot they went....

...But this method did nothing to loosen the glitter paint. Anybody have a method to remove what I think is spray paint?

Saturday, March 28, 2009

Another Great Mess

Well, this is what the upstairs looks like today. I cleared everything out of the west attic and pulled the rest of the rock wool insulation out. That was the last section that needed to be done. I used every last trash bag, empty dog food and mulch bags that I had in the house and there is still more insulation and trash to be bagged up.

There is no insulation on this side of the attic now. And the temperatures have dropped near or below freezing again. In truth, I don't feel it much because the old insulation wasn't insulating very well.


And in other news...
This was the weedy, lumpy section of my lawn last summer.

Last night after work, I covered it with landscape fabric in hopes of smothering all that is there in order to prepare the area for some new garden beds.


It was a cold, gray day today. I am glad to have all that insulation pulled out. It was the worst job ever. I still need to figure out how I am going to insulate the attic above the ceiling. There is no access as far as I can tell. I may have to cut a hole in the ceiling. I really don't want to do that. I also do not want to crawl up there. I may hire that job out.